As a small business owner, it can often feel overwhelming with the number of hats you have to wear in order to run your business. Let’s not let social media and content creation be one of those stressors!

Are you a small business owner? Or are you in charge of posting on social media as part of your job description? Maybe you started writing a blog in the new year and already are a bit overwhelmed with keeping to a schedule. I want to share with you my tips on how to create a social media content calendar that is low stress and fun to do.
I’ve tried several different digital social media planners over the years, some were free and some I paid a yearly fee for. There were many features that I liked about them but lately, I’ve been yearning to pull away from the phone and computer and go back to basics a bit with pen to paper. I find it calming to open up my paper planner in the morning and write out my goals for the day, my schedule, as well as my to-do list.
Step 1: Print out a monthly calendar or begin working in a paper planner. This year I am using Plum Paper. I like that I can personalize the daily pages and customize the planner to fit my needs.
Step 2: Identify the topics that you want to talk about. I believe that five topics should be the max so that your message comes across very clear to your audience. Allow them to get to know you and understand what your brand believes in. This helps to keep you streamlined on the content that you create and alleviates the need to post something just for the sake of posting. You want your posts to be important to your audience. There are enough selfies already in the world! Bring value to what you post online.
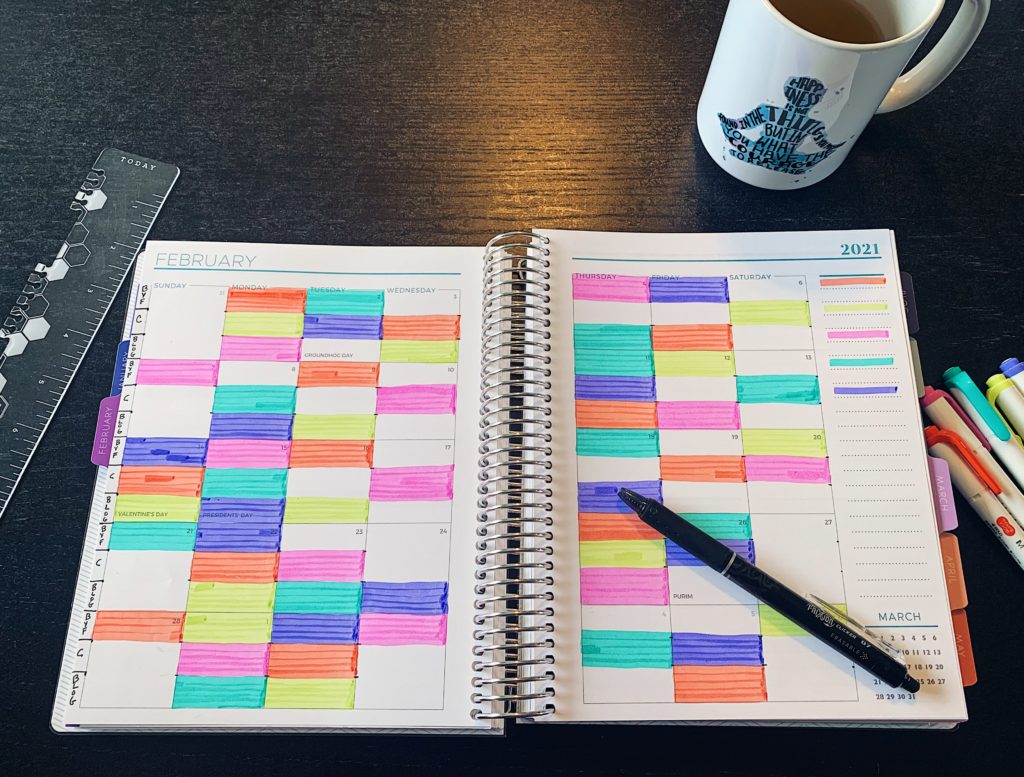
Step 3: Now for the fun part! Color coordinating your topics. I like to use Zebra Mildliners , they are easy on the eye to look at and I can quickly see at a glance the topic that I should be posting about on the particular day. Designate a color to each topic and create a “map” off to the side of your calendar so that you remember what color goes to what topic.
Step 4: Decide where you will post the content based on where your audience interacts with you. Do you have more than one place in which you are creating and posting content? Divide each square into the number of places where you post content. As you can see in my picture above, I post on Bee Yoga Fusion Instagram, Gretchen Schock Wellness Instagram, and here on this blog. So I divide each day into 3 separate blocks.
Step 5: Determine how many times in a week that it is possible for you to create and post original content. Is that three times a week for each? Or do you think you could post daily on one platform and then less so on another platform? Set your goal for the number of posts per social media location or website.
Step 6: Then take your color pencils or markers and begin at the start of the month. Using your topic map start with the first color and then move on to the next filling in the squares with alternating colors. Some people choose particular days of the week in which they will talk about a certain topic or theme. I’ve done that myself and found it a bit stagnant for me in my creative process. Instead, I focus on the goal of the number of posts a week per social media location or website and less about hitting a particular day of the week with content. I like the variety of alternating the topics regardless of the day of the week. Make sure to give yourself days off!
Step 7: Now that you have your color blocks filled in, look at your calendar and the pictures that already exist on your phone and spend 30 minutes deciding on content that you will share for the upcoming week. You don’t have to write the actual text for the post but maybe you already have a picture or an idea of what you will want to write about. “Favorite” your pictures so that you can easily find them on the day of your post.
Step 8: Stick to the plan! Everyday open up the calendar and see what you should be posting about so that you stay focused on your goals and your brand message.


